
Coloringbookmaker.art can be more than just a tool for you to turn your drawings seamlessly into coloring book pages. The tool can be used for many more possibilities for your creative projects!
Uses for Coloringbookmaker.art tool:
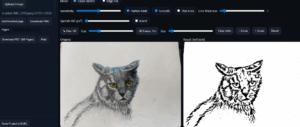
Coloring book page: This tool allows you to transform your drawings into a coloring book page, and also allows you to edit your page by using the eraser and pen to adjust any folds that may have transferred, or unwanted lines, or add missing lines.
Woodburning template: This tool is actually perfect for this because it points out the values in your photo so you know exactly where to woodburn.
Canvas Painting: As an artist, it’s important to know your values. The Coloringbookmaker.art tool not only helps you understand the values in your photo to paint, it can also give you a beautiful outline to use so their is no guessing on proportions. This way you can spend more time working with color than guessing values and proportions, making art a much more enjoyable process.
Tattoo Templates: Lots of people want someone’s face tattooed on their arm, or perhaps a unique tattoo that no one else has. Coloringbookmaker.art tool allows you to create the most perfect template to be transferred to your customers body, insuring that the artwork is preserved in the most accurate form.
3D Printing: This tool can create a template for 3D printing as it simplifies the first step of converting a complex photo into a clean, high-contrast design that 3D modeling software can easily interpret.
Laser Printing: The coloringbookmaker.art tool allows a highly effective feature for preparing Raster files. Laser engravers struggle with grayscale photos and this tool converts the photo into pure black and white lines, so the laser knows exactly when to fire the lines creating a crisp, clean engraving. The invert function on the coloringbookmaker.art tool flips the image to white lines on a black background. This is the exact format needed for engraving dark materials such as black slate coasters or anodized aluminum. The tool helps with toner transfer methods, foiling and also can save on ink by using more simplistic lines while keeping the subject to it’s original form.
Easy steps to creating your coloring book:
Coloringbookmaker.art works best on a desktop– it is mobile friendly- however after you upload a photo on a mobile device it can take 10-20 seconds to become responsive depending on your devices memory capacity.
01
Upload a photo
A great place to start creating a personalized coloring book for your child or grandchild, students, or even other projects like a template for woodburning, canvas painting, or 3D printing or a template for laser printing. Click on upload image, select a PNG photo from your computer files or gallery. Next step is to edit your converted page. You can find more information about editing at the bottom of this website.
02
Edit your page
You can turn the pen on, adjust the pen size to match the line thickness of your page, and add lines. You can turn on the eraser and adjust the size and erase lines. IMPORTANT: You must turn OFF pen if you want to use the eraser. You can not have the eraser and pen on at the same time. They cancel each other out. If you make a mistake and want to start over on your page, hit clear edits. It’s a quick way to start over.
03
Save or print
You will need to select “add finished page” when you are happy with your end result. You can select several “add finished pages” before printing all at once. You can also “download PNG” if you want to save your pictures before exiting the software. You must use “add finished page” before printing or saving your project. It is important to download your pages before exiting the software so you don’t lose your finished work.
More on Editing your page
You can adjust your line thickness by scrolling the line thickness bar (located directly under the sensitivity bar) making your lines thinner (to the left) or thicker (to the right). You can adjust the sensitivity (making the photo pick up more detail or less) by sliding the sensitivity bar right after the word “sensitivity”. You can turn pen ON and adjust the size of the pen (left thinner, right thicker) and add lines if need be. You can turn pen OFF and then turn eraser ON and adjust the size of the eraser to the left for a small size (recommended) or all the way to the right for a larger eraser (not recommended at first). You can hit “clear edits” to clear all adjustments and start over again. Invert will change the black lines on white background to white lines on a black background. You can slide speckle kill to have more or less “noise” on your finished product. Usually the converted image setting is a good fit for the finished product, so this is rarely needed unless you want a different type of art. The “smooth” and “thin lines” check box makes tiny automated adjustments to your page. When choosing to print the photo you can change the view to landscape instead of portrait and it will fill the whole page. Portrait view will allow space at the bottom of the photo to add text to your Coloring Book. Please remember to always save your finished pages before exiting the software.
Why I Created My Own Coloring Book Maker (And How My Love of Art Inspired It)
For as long as I can remember, art has been more than a hobby for me — it has been a comfort, a form of healing, and a bridge between my heart and the world. Drawing, painting, and creating have always given me clarity when life felt overwhelming, and joy when I needed it the most. So when I wanted to turn my artwork into coloring books, it felt like a natural extension of everything I loved:
creating art that could inspire, comfort, and brighten someone else’s day.
But I quickly ran into a problem…
There was no simple way to do it.
The Problem I Kept Running Into
I searched everywhere for a tool that could transform my drawings into clean, beautiful, printable coloring pages.
Something:
- Easy to use
- Fast
- Accurate
- And designed specifically for artists
But every option I found was missing something.
Some were too complicated.
Some didn’t capture the details of my artwork.
Some required advanced graphic skills.
Others were slow, clunky, or simply not designed for coloring books.
I kept thinking:
“Why isn’t there a tool made for artists like me—people who want to share their art in a simple, meaningful way?”
And when I realized nothing existed…
I knew I had to make my own.
How My Love of Art Became the Motivation Behind the Tool
Creating art has always been a deeply personal experience for me.
It’s how I cope, how I heal, and how I connect with others who may be walking through difficult moments in life.
That’s why designing this coloring book maker felt so natural.
It wasn’t just about building software…
It was about giving artists and parents and creators a way to:
- Turn their artwork into something shareable
- Make personalized gifts
- Create meaningful keepsakes
- Connect through creativity
I wanted to build something that removes the frustration and lets people focus on what they love — the art itself.
And every time someone uses my tool to create coloring pages for a child, a loved one, a class, or even their own healing journey, it fills me with the same feeling that art has always given me:
Purpose. Connection. And joy.
Why This Tool Matters To Me
This project isn’t just a tool.
It’s a piece of my artistic heart — something built from love, creativity, and the desire to help others express themselves.
It came from the same place inside me where artwork has always lived:
- The part that understands how powerful creativity is
- The part that knows art can heal
- The part that wants to make life brighter, softer, and more meaningful
- And now, I get to share that with you.
Whether you’re an artist turning your drawings into a book,
a parent creating something special for your child,
or someone who simply wants to bring more creativity into the world…
I hope this tool makes your journey a little easier, a little more joyful, and a lot more magical.
From One Creator to Another
Thank you for sharing this space with me.
Thank you for believing in your art, your ideas, and your imagination.
And thank you for letting my tool play a small part in your creative story.
If you ever need help, inspiration, or ideas for your next coloring book, I’m always here to support you.